
| The MakerBot METHOD, paired with the MakerBot CloudPrint software, enables 3D printing that’s powerful, intuitive, collaborative, and accessible anywhere. 1. MakerBot CloudPrint allows students to create 3D designs remotely and send them to a printer. |
It might not have seemed likely, but 3D printing is possible in any educational environment—especially with the MakerBot solutions. The MakerBot METHOD, is a powerful STEAM tool that students can use to create all kinds of three-dimensional objects. Pairing it with the MakerBot CloudPrint software, however, makes it much more valuable. Using MakerBot CloudPrint, students can collaborate and 3D print objects from anywhere, including at home, with just an Internet connection. So, even if there's talk of hybrid learning or fully remote learning returning at any point this year, just keep in mind that making 3D printing a part of STEAM education is still a possibility.
Getting started with MakerBot CloudPrint.
The MakerBot CloudPrint software has been available for a while now and allows students to manage prints from anywhere. It gives them the option to collaborate through the cloud and take the 3D printing and design processes even further. In this era of evolving learning environments, the option to access 3D printing remotely can be very valuable. If using this technology remotely, all students would need is to have someone be with the physical printer to remove the print by hand once it finishes.
When first introducing this new wrinkle, the MakerBot team compared creating a 3D design at home to engineers involved in manufacturing. Many engineers had started working from home as a result of the pandemic and were able to still create designs remotely. They'd then test them on a home printer, make any tweaks needed, and queue it up to print on-site. This meant factory workers had to be there, but could pick up the piece right away and use it immediately. At the same time, engineers had the option of emailing 3D printer files to each other to keep the collaborative part of their job alive. And, that's definitely something that was considered in the process of creating the CloudPrint software.

Connecting a printer and launching the software.
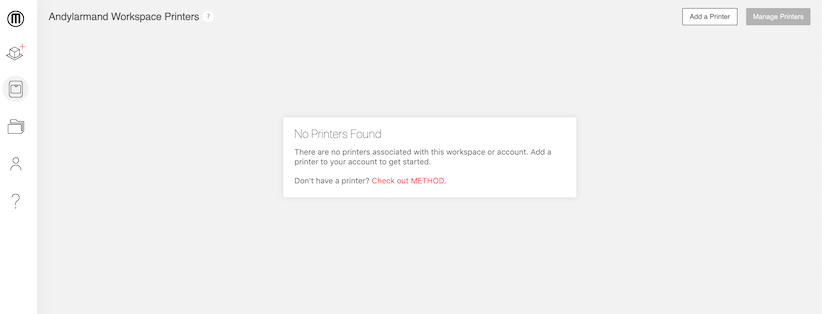
To get started with CloudPrint, all you need is a MakerBot account, an Internet connection, and a 3D printer. Students can use a 3D printer that's with them in person or at another location. They also don't need to download anything to use MakerBot CloudPrint and all updates occur automatically. When logging in, you’ll see your ‘workspace’ like in the image below and the displayed message should read ‘No Printers Found.’
To connect to a MakerBot 3D printer, click the ‘Add a Printer’ button in the top right corner. It will then prompt you to choose whether you’re using a METHOD printer, a SKETCH printer, or an older MakerBot printer. Now, select the one you're using and it will prompt you to enter the six-digit authorization code found on the printer under Settings. Click ‘Authorize Printer’ and you should be good to go. You can then click ‘Start a Personal Print’ on the left of the screen and provide your file if necessary.
With CloudPrint, students can still access the full suite of MakerBot 3D printing options and take advantage of the best-in-class features of the printers themselves. There is a full range of settings, tweaks, and options available to choose from within MakerBot CloudPrint. Users can view their printers directly from the software’s interface, allowing them to see what’s on the printer’s print bed in real time. Students also get a full “print-prep” view so they can ensure they have their parts well-positioned before beginning the job. Depending on the student’s prior 3D printing experience, they can choose to use the optimized print modes or access the printer’s advanced settings to take advantage of custom options.
Additional MakerBot CloudPrint features.
One of the coolest features of CloudPrint is viewing live updates of in-progress prints thanks to live printer camera feeds. Instead of simply walking by and checking in on a print, they can monitor them using a remote camera feed. This is great for group work since it allows all students working on a project to be up to date on its progress. Plus, all members of a group can access the same information through CloudPrint. Even if students are in separate locations, they can still work as part of a team and focus on efficiency.
We should also mention that, if you have multiple MakerBot printers in your classroom or makerspace, there’s no need to worry about efficiency issues or overuse. The CloudPrint software helps maximize efficiency by always searching for the next available printer. This is a process known as intelligent queuing. You can also re-prioritize print jobs at any point in time should the need for a more important print arise! Also, if students are using a CAD program to create 3D print designs, they can now print them directly to their MakerBot printer with just two clicks. This feature works with a few different CAD programs, including Autodesk, and you can download your preferred option here. They can also find design ideas within the MakerBot Thingiverse community.
Once students get comfortable with designing prints remotely and learning in this new kind of environment, the power of the METHOD 3D printer should make them feel like they’re doing it the normal way. The CloudPrint software paired with the METHOD provides a very intuitive and fully connected 3D printing experience for both individual students and student groups. Of course, the option to use these technologies remotely is a huge plus as well. We should also mention that the MakerBot METHOD specs make it very compact, so, as a teacher, if you would like to have students send prints to the printer while outside of school, that’s certainly a possibility! Other than that, it’s the same old, incredibly reliable, and extremely engaging 3D printing experience from MakerBot!
If you have any questions about the specifics of using the MakerBot CloudPrint platform with the MakerBot METHOD for in-person 3D printing or in a distance learning situation, please don’t hesitate to reach out to our team. Be sure to check out the various MakerBot offerings our store below, including the 3D printers, accessories, carts, and filaments. And, remember to follow us on Twitter and Instagram to make sure you see all of our educational content, including key EdTech Tips & Tricks for teachers!


