
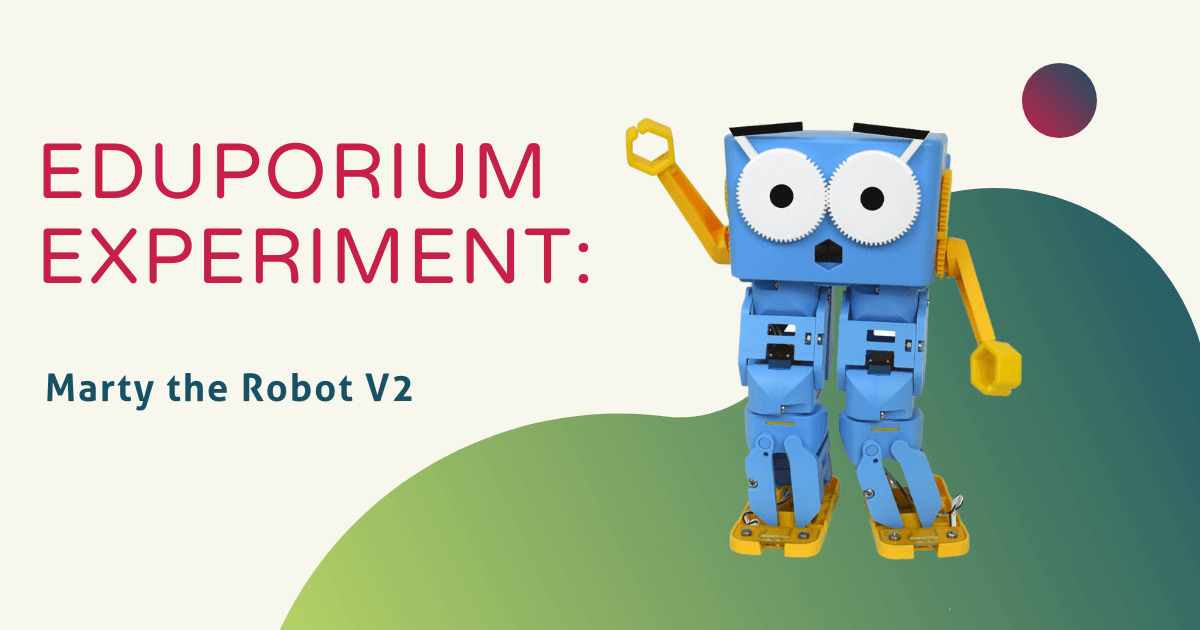
Combining simplicity, versatility, and functionality, the Marty Robot V2 and its latest upgrades help STEAM teachers lead all types of relevant learning. It looks real similar to the original Marty Robot but the V2 model comes as a complete solution for any STEM classroom. Besides creating new opportunities for students to try engineering, coding, and collaborative problem solving, the Marty V2 also unlocks new opportunities for teachers to improve on their instruction. There's so much they can do with the latest version of this coding robot—starting with amplifying student engagement and leveraging the Robotical Learning Portal to find tons of classroom STEM resources.
One of the most important updates to the Marty V2 is the four different options in terms of packs. Beyond the single pack, there's a 5-pack, 10-pack, and 15-pack to help support coding and STEAM exploration in different environments. They each include materials for leading impactful robotics lessons, which you can find in the Marty Quick Start Guide below. Perhaps more importantly, the Marty V2 helps children build key computational thinking skills, enhances engagement, and nurtures growth with its unique 'human factor.' Plus, the different STEM kits include many of the same materials—just in varying quantities. Single packs come with the Marty V2, an educator guide, batteries, coding cards, and stickers. The class packs, on the other hand, also include battery charging docks, spare batteries, and distance, infrared, and color sensors.
Find Your Marty V2 Quick Start Guide.
The Marty V2 is viable throughout the K-8 grades and students can easily build the robot themselves. This feature allows educators to incorporate engineering experiences and helps students align their heads and hands during the building process. Once constructed, students can explore opportunities for the different types of coding with the compact robot. It's fully programmable and can help educators create equitable and accessible coding opportunities for all elementary and middle school students. Beyond engineering, students can program their Marty V2 using Scratch or Scratch Jr. (for those who are newer to coding) as well as Python (for those who already have the foundation). And, like we've said, these class packs help educators incorporate a few different types of sensors for students to explore.
Each Marty Robot has various sensors, including position, tilt, proximity, force, an infrared obstacle sensor, and a color sensor. It also has a built-in speaker that students can use for programming their robots to talk and make other sounds. And, with the class packs, educators also receive some extra IR obstacle sensors, distance sensors, and color sensors. They help teachers create extended programming opportunities for students without adding too much complexity. Plus, for students with more advanced skills, they can work up to adding extra sensors, like a temperature sensor, noise sensor, or light sensor and even potentially 3D print their own custom robot parts down the road.
Marty V2 coding languages.
In terms of coding, students can use Scratch Jr., Scratch, or Python with the Marty V2. They need a device for coding with Scratch, though there are unplugged activities available too. It pairs through Bluetooth, so if coding with a Marty V2, children also need a tablet or a phone. The Marty the Robot V2 app is available for download on iOS and Android devices. With this intuitive app, they can program the robot using the built-in controller or the Scratch or Scratch Jr. options known as MartyBlocks and MartyBlocks Jr. Once they insert the batteries and power on their robot, they can find and connect to it through the app.
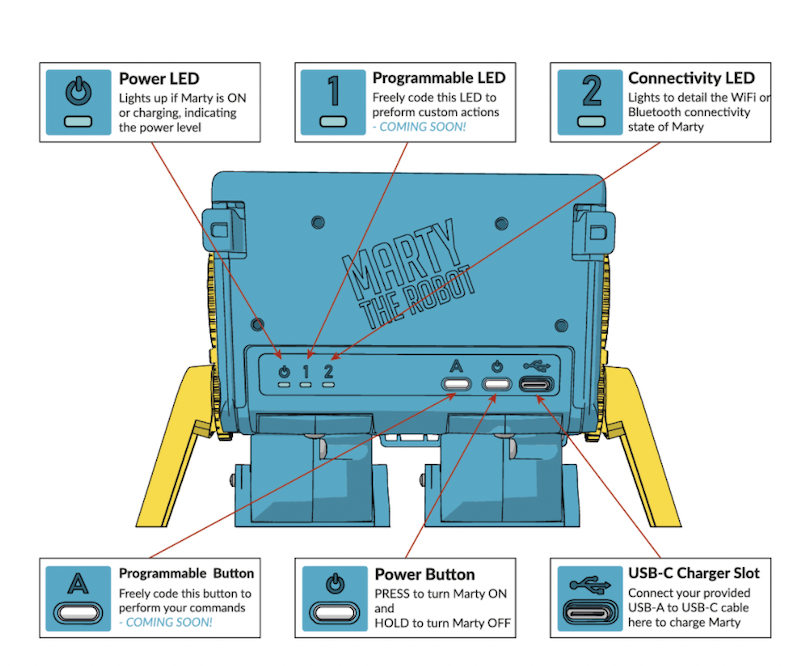
To power the Marty on, find the power switch on the backside of the robot. If it needs to charge, students or teachers can slide the included USB-C cable into the charging port on the right of the robot's backside. Students can also use the Marty V2 while it's charging, adding some extra versatility to the fray. The power indicator to the left of the power button should light up to indicate that the robot is on. If any robots are still charging, the light will flash blue and, when fully charged, it will turn solid blue. If it has enough power, kids can start using the Marty V2 with Scratch, Scratch Jr., or the controller.
Tips for creating programs.
When creating programs for their Marty, it's best for students to start with a 'Get Ready' block. This helps ensure that the robot is standing upright and that each of its motors are powered up. In the Scratch coding environment, students can find this block in the Events section. They can drag it into the programming field and connect a 'when clicked' block or whatever block they're using. It's important to ensure the blocks join together so that their program runs and also runs correctly. Once they have something built, they can test it by pressing the green flag. From there, they could incorporate any of the other movement blocks, including walking, dancing, and many more.
If applicable, students can also add precise parameters to their programming blocks. When adding a 'walk' block, for example, they can choose the number of steps they want the robot to take. If they're using a turn block, they can choose the number of steps it turns and its direction. They could also try programming it to walk backwards, dance, kick, and move its eyes among plenty of other actions. Once they are comfortable with these more basic commands, students can also utilize the more in-depth blocks and set more precise parameters, build sequences, and make the robot repeat actions using loops.
Starting with MartyBlocks and MartyBlocks Jr.
Typically, there are four ways that students will code with the Marty V2. The first of those is with Scratch, which is called MartyBlocks. It's based on Scratch 3.0 and serves as a visual, block-based language for kids. Ideal for students aged 8-16, MartyBlocks coding involves students creating programs using visual expressions rather than text-based elements that we often associate with languages like Python. Among other functions, children might use MartyBlocks to program their robot's movements and its reactions to sensors. They don't need any prior coding knowledge to use MartyBlocks because it helps unlock open-ended, experiential, and experimental learning through play. To launch MartyBlocks on the Marty V2 app, simply click the MartyBlocks button to open up the color-coded programming field.
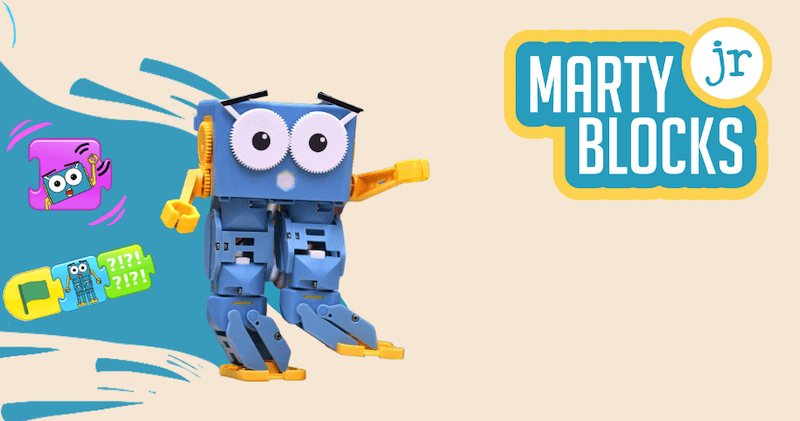
Next, we have MartyBlocks Jr., which, as you might guess, is a more simplified version of MartyBlocks. It's super similar to MartyBlocks but more accessible for younger students with an ideal age range of 5-7. With MartyBlocks Jr., the icon-based and visual environment helps kids start to associate robot commands with making puzzles. When they group these together, they can see how a robot can ultimately understand and execute them. Though the students who are using MartyBlocks Jr. are likely brand-new to programming, it allows for independent exploration and learning through failure. It's also easily accessible with its selection of triggering, motion, looks, sounds, and control blocks right in the app.
Python programming with the Marty V2.
Then, there is Python, which is for more advanced programmers and older students. Typically reserved for later on in middle school or not until high school, Python is completely text-based and requires students to type out their programs. They can use this language to program their Marty to do a lot of the same actions as they could when using the Scratch environments but creating these specific programs is more complex. Students could use the Marty V2 with Python on Windows, Mac, or Linux computers and it also works with Raspberry Pi's. To start using the Marty V2 and Python, check out some of these installation instructions and guides. And, be sure to leave enough time for installation and helping kids figure out the environment.
One additional option for coding with the Marty V2 is what's known as Marty Unplugged (it's also possible to use JavaScript, too, but we'll save that for later). As you may have guessed, this involves using the robot without a connected device—whether to reduce their screen time or to add new elements of versatility and accessibility. When using the Marty in unplugged mode, the color-coded cards we've mentioned really help teachers lead meaningful lessons. Since they're color-coded, students also need to use the included color sensor, which detects and reacts to the various colors. Using the cards, kids can guide their robot through courses, mazes, or other challenges without needing a device. Plus, kids as young as five years old can use unplugged mode since no prior coding knowledge is necessary.
Screenless coding for early learners.
While using the V2 in unplugged mode, young kids can start to recognize both sequences and commands, which helps them build a coding foundation. To activate unplugged mode, simply turn it on and press the A button, which is right next to the power button. Students can also turn unplugged mode off by pressing the A button again. The power indicator should then turn white for a few seconds, indicating that it has entered unplugged mode. Once activated, the robot will be able to detect the color of each card students have laid out. Each of these represents a different command and, since the Marty's color sensor is on the bottom of its foot, it detects each color as it steps across these cards. And, despite not needing an additional device, kids will still begin associating input values with outputs—another foundational coding skill.
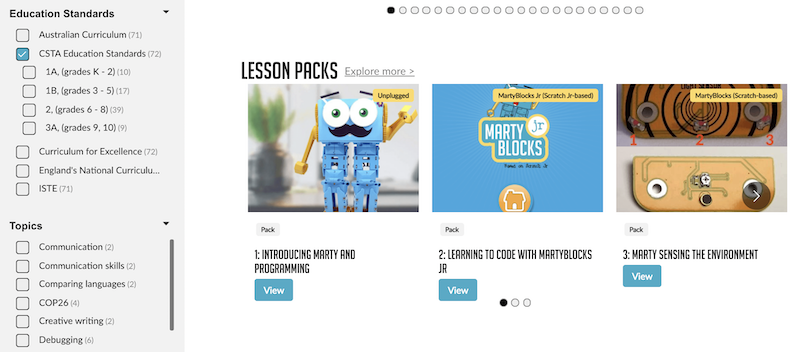
Finally, the last key piece to teaching and learning with the Marty is the Learning Portal that we mentioned. Whether you're using the V2 or the original Marty V1, this portal is super useful. Students or educators can simply select their locations and their Marty version. Then, they can find truly relevant lessons for teaching coding, engineering, and many other STEM-related skills. On the left side of the portal's screen, you'll see additional sections beneath the Marty Version, including standards, topics, environments, challenges, and Marty add-ons. By checking the boxes in a category, teachers can find relevant lessons, lesson packs, or activities. Also, the standards include both CSTA and ISTE alignment and some international curricula.
Finding and accessing Marty V2 coding lessons.
Students could also sort lessons by topic, which includes debugging, creative writing, listening and talking, programming, social wellbeing, and teamwork among others. As for the environments section, this helps to make it easy to find projects based on a particular coding language, including Scratch, Scratch Jr., Python, and Marty Unplugged. Educators can also sort projects by degree of difficulty (beginner, intermediate, and advanced) and also quickly find some that incorporate many specific Marty features, like using its distance sensors, its IR sensors, or even its disco feet. From there, each lesson includes an introduction, the list of materials, a review of what you're teaching, and teacher tips. They also have step-by-step instructions as well as illustrations to help ensure efficiency.
We know it's a lot, but hope this helps you better understand all that students can do with the Marty. If you have any specific questions, feel free to contact our team to learn more. As a reminder, you can find all of our Marty the Robot offerings in the Marty section of our store. You'll see the single unit as well as all the robust and updated classroom packs. And, as always, follow us on Twitter and Instagram for more!
Thanks,
Sarah