
Panoform VR is an online design tool that students can use in creating virtual reality content. Designed to do more than simply immersing kids in virtual reality, Panoform VR allows students to become creators and own how they design and view new-age media. Though it may seem complex and highly technical, it's actually very accessible—even for beginners. The Panoform team designed the platform to make it easy on just about anybody who's trying their hand at VR-based creation. So, in our latest Rising Resources post, we're exploring Panoform VR and what makes it a valuable classroom addition.
To use Panoform VR, kids need some paper, the grid, drawing utensils, and a device with the Panoform VR software. The Panoform platform itself is browser-based and it's also compatible with most mobile phones. Whether students use it on a desktop or smartphone (it's typically best with a smartphone and any Google Cardboard viewer), the platform should work well. Their team designed it so that it's as simple as possible for kids to learn with and recent updates have made it even better. Plus, once they create any new design, students can store it right on their devices. This eliminates student content being stored on the Panoform servers and ensures no one else can see it.
Viewing images and downloading Panoform grids.
Students can use Panoform VR with a Google Cardboard headset if they have one. Most phones slot right in to the opening with your cardboard VR viewer, allowing students to access virtual reality views. Basically, students can draw pictures and designs on paper and then take photos of those designs with their phone's camera. Then, once they launch Panoform VR, they can select a grid and upload whatever image that they want to use. Once uploaded to the Panoform platform, children can access all-new angles to viewing their artwork and explore the immersive side of VR in the process.

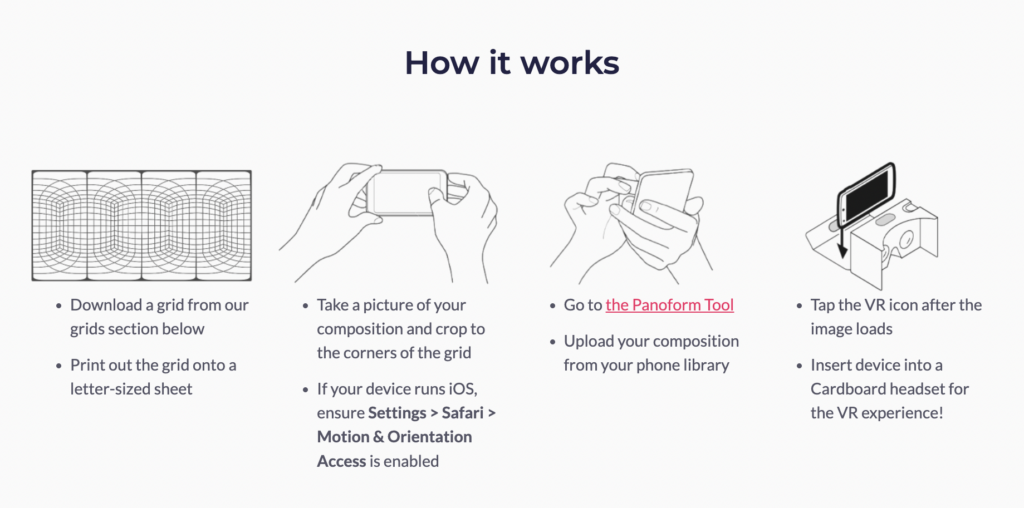
The other important piece of the Panoform VR platform is their grids. Students can download these grids right off the Panoform website, print them out, and sketch their drawings on them. There are three different Panoform grids to choose from—the Basic Grid, Infinite Grid, and Horizon Grid. First, when using the Basic Grid with their VR viewer, students will just feel like they're inside a small room. As such, their drawings will then appear on the walls, floor, and ceiling. With the Infinite Grid, it will appear that their drawings are going on forever. And with the Horizon Grid, drawings will also appear to go on forever but with no sky.
Drawing pictures to view with the Panoform VR platform.
Once they choose a grid to download, they can simply print it and begin drawing—just like on paper. Since each of the grids is unique, students can access different benefits depending on which one they choose to use. When students see examples of the grids displayed on the Panoform website, all of the lines are dark. When they download and print them, however, they'll notice that the lines are much lighter. This, of course, helps make it easier for them to draw their designs. Also, most of the time, students should use pencils for their sketches, so they're easier to view in VR.
The grids are each rectangular in shape, which allows for students to easily fit them into these VR viewers. Once they draw their design on a printed grid, students can take a picture of it using their device's camera. There will be prompts to help them crop the corners of their images for the best views as well. Also, due to some recent iOS updates, kids will likely need to enable Motion and Orientation access on their device—a crucial piece of using the Panoform VR platform to view images in virtual reality. On iOS devices, they can do this by going to Settings, then to Safari, then down to Motion & Orientation Access. They'll just simply toggle this option on to enable the motion and orientation feature.
Uploading images and viewing them in VR.
Once you're sure the feature is enabled, kids can go to the Panoform platform from any browser. Because they already enabled access for Safari, they should stick with this browser rather than trying different ones. Once they're in the Panoform VR platform, children can click to upload their composition directly from their device's photo library. Then, once the image loads, they can tap the VR headset icon in the bottom right of the screen. This puts their device into VR mode and allows students to view their drawings in virtual reality. Then, the last step is placing their phone into the viewer and they're ready for a VR experience.
With the recent updates, the Panoform VR platform is now much more powerful, too. The Panoform team redesigned their platform to boost performance and provide users with more developed features. Their VR environment now loads much more quickly on almost all devices and even has offline accessibility (as long as the device students are using supports this). Once instructors ensure all this technical set-up is in place, however, children can truly create and express themselves in entirely new ways. In fact, since drawing and coloring are so closely related to play, a lot of this creativity comes naturally to them once they get going.
What students can learn with Panoform VR.
In using Panoform VR, students will actually engage in computational thinking, design thinking, and even systems thinking, making it a super relevant and valuable tool for 21st century learning. This helps students learn the value and importance of making prototypes and then refining their original ideas for greater clarity. From visual reasoning to spatial translation, students can get that full experience when it comes to creating a contemporary spin on art. Plus, when hand-drawing what will eventually become new VR resources, they can bring to life even their most far-fetched ideas and see what it's like to incorporate their uniqueness and creativity in classroom expression.
To get started with using Panoform VR in the classroom, teachers should just make sure every student has a device and, ideally, a cardboard VR viewer. Educators can also print out and provide the grids to children ahead of time so they can get started up more quickly. We encourage you to check out the Panoform VR website to learn more about the platform and prepare for introducing students to it. After you've done that, check out some of our classroom VR offerings in the Virtual Reality section on our store. And, as always, please reach out to us with any questions and follow us on Twitter and Instagram for more.