
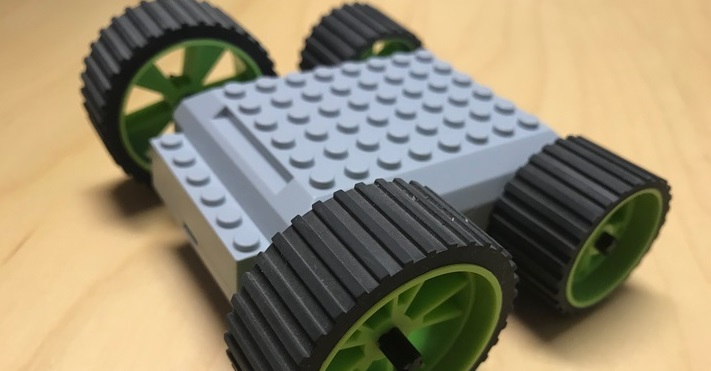
The meeperBOT is an affordable, programmable, and LEGO-compatible robot recommended for kids aged five and up that features a simple design but packs some great capabilities. Kids can drive, program, and video their bot using three different drive modes and various command functions in the meeperBOT app, which is compatible with both Apple and Android devices. It’s really easy to use as it connects via Bluetooth to the app and requires just one 9V battery to power its rear dual-wheel motors.
The meeperBOT is known to empower students to build inventions on their own using brick blocks to create a custom robot in any way they would like. They can even choose from eight fun colors and visit the Meeper Garage (online) where they can seek inspiration, find help for their questions, and even post their Build of the Day!
To get started, I downloaded the meeperBOT app, flipped the power switch on the bottom of the robot, and made sure my Bluetooth was activated on my device. My device recognized the meeperBOT instantly. I just had to click “not connected” to connect my meeperBOT. I learned that it’s possible to connect up to eight bots at a time, which is pretty great for collaborative projects in the classroom! The app automatically named my meeperBOT ‘meeperBOT2,’ but kids can easily rename it later in the My BOTS screen to help differentiate their bot from others. They can also edit its icon and color in the BOT screen.
Once I was all set up and connected, I navigated to the drive section. As I mentioned, there are three different drive modes to choose from: command drive, touch drive, and tank drive, which progress in difficulty. Students can move in any direction and easily switch between drive modes while an on-board odometer tracks the distance that the bot travels. The camera mode, located in the top right corner, allowed me to drive my bot while videoing and taking pictures of it! It’s also possible to enable or disable the sounds of the motor by clicking the sound icon in the top right corner—perfect for teachers who want to keep the noise down.
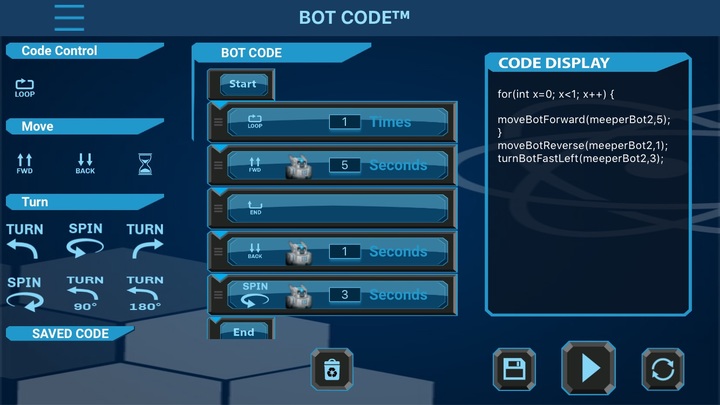
I then decided it was time to experiment with the coding function. I clicked BOTCode, where I was able to program sequences of actions for my meeperBOT to complete. Commands include loops, delays, forward, reverse, and spins. Kids can also edit the commands, choosing their duration and which bot they want to run the command. It is a drag-and-drop programming environment made for beginners, however, students can see how their code translates into Java too! Luckily, they’re able to save their programs so they can come back and easily edit them later. Other cool functions include calibrating the robot to travel on different surfaces or playing hide and seek with the meeperBOT!
The meeperBOT is very portable, conveniently mobile, and highly intuitive, enabling kids to learn the basic concepts of programming and robotic behavior. It also helps bring LEGO to life by incorporating modular making into the curriculum, which, in turn, shapes the beginning of a physics foundation for students. The customization that the meeperBOT provides kids is unmatched—whether it’s tall and colorful LEGO creations or finding an innovative way to connect two meeperBOTS to each other! Designed to simplify robotics into an age-appropriate series of play-based games and activities, the meeperBOT helps bring hands-on learning alive and teaches kids some of the most important skills they’ll need for life in the 21st century.
To purchase one for your classroom (or your child), visit the Eduporium store. And, look out next Wednesday for the newest edition of the Eduporium Experiment featuring the micro:bit! In the meantime, don't forget to follow us on Twitter and Instagram for more and you might as well like us on Facebook, too!