
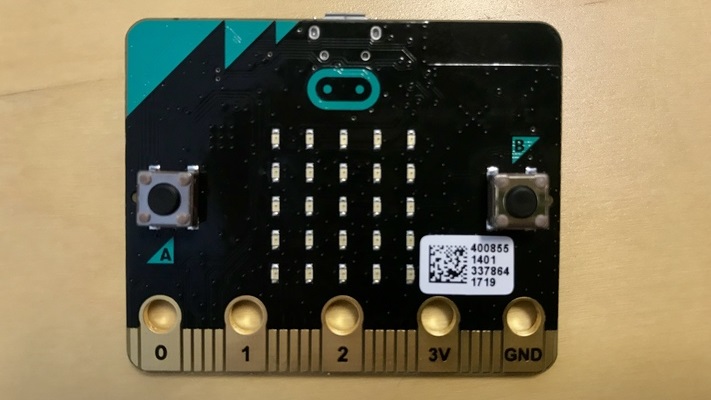
Searching for an affordable mini computer for your students to code? Look no further. The micro:bit measures 4cm by 5cm and is completely programmable. It has 25 LEDs that students can code to light up and display various images, numbers, and text, as well as two buttons, inputs, outputs, an accelerometer, and a magnetometer that each can be individually programmed. There are also five pins, or external connectors, on the bottom edge of the micro:bit that kids can connect to sensors, motors, LEDs, and other electrical components to program or control the code they write.
To download code, students simply plug the micro:bit into their computer with a USB cord or into a battery holder while utilizing the micro:bit’s radio and Bluetooth functionality to connect it to other micro:bits, devices, phones, tablets, cameras, and various everyday objects. I discovered how the micro:bit can be coded in numerous programming languages, ranging from beginner to advanced, providing a complete scaffolding from introducing coding to improving seasoned skills. Languages include Blockly, JavaScript, Python, Scratch, and more, without having to download any software!
I have to admit that I was pretty excited to experiment with the micro:bit this week. I wanted to know what all the hype was about! As I got to work, I plugged my micro:bit into my Chromebook using the USB cable. It popped up on my computer as a drive called ‘MICROBIT.’ I decided to try out the JavaScript Blocks editor, which I found easily on micro:bit’s website. This is a web editor, so I didn’t have to download anything, which helped simplify the starting process.
I dragged and dropped code blocks to make my micro:bit light up in a diagonal pattern and then light up as a smiley face. I then chose the text ‘happy birthday!’ to scroll across the LED display upon shaking the micro:bit and activating the accelerometer. After that, I switched over to the JavaScript editor to see how my code translated. It was enormously helpful to be able to switch easily between the two, and the entire editor was extremely intuitive, fun, and engaging. I didn’t want to stop coding!

This technology is great for replicating larger scale programming in a greatly simplified way. The intended age range for students looking for a new way to program is 13 and up with greater success coming the more kids practice with it. Like a Raspberry Pi, the micro:bit can allow kids to build original devices and explore how knowing how to program can unlock an amazing world of possibilities. There’s a reason why every student in the UK was given a micro:bit—and I can definitely see how its simplicity and power make it a great way to teach higher level programming!
The micro:bit is used widely around the world due to its affordability and amazing versatility. Need some inspiration? Students can find tons of activities and resources online, ranging from beginner activities to advanced challenges. To purchase some for your classroom, visit the Eduporium store. We also recommend various micro:bit accessories that can be found at the above link as well! And, look out next Wednesday for the newest edition of the Eduporium Experiment featuring the MOD-t 3D printer! In the meantime, don't forget to follow us on Twitter and Instagram for more and you might as well like us on Facebook, too!