
Within the last couple of months, we’ve been able to take our partnership with DJI further by adding their new Tello EDU drone to our store. This compact drone is designed specifically for use in education and combines elements of both piloting and programming. Students can use two different apps to create simple programs in Swift, Python, or Scratch and truly start to understand what it’s like to be a programmer. Plus, the Tello EDU is very affordable for educators and bringing in drones for the entire class is also possible thanks to the variety in kit sizes we offer. To learn more about some of the best features of the Tello EDU drone, keep reading!
Programmable
The best thing about the Tello EDU drone is that it is programmable. Typically, drones are beneficial in education because they offer students the chance to learn a new technology and snap some cool shots from the sky. This allows for them to complete many different kinds of projects, but it was still missing something. That’s why the addition of programming to drone piloting is so encouraging and exciting for STEM education. It, of course, allows teachers to add such an important element to teaching with drones. With the Tello EDU drone in particular, students can use one of three programming languages to create progressively more complex programs for their drone to execute. The three languages, as we mentioned, are Swift, Python, and Scratch. Each offers its own sets of benefits for students and each can be integrated in education rather easily.
Getting started with the Tello EDU programming are each pretty easy. Students can use either the Tello or Tello EDU app and connect it to their drone via Bluetooth. With the free version of the Tello app, programming options include adding up to six maneuvers for the drone. Students can create programs that include the following actions: Taking off, flying forward or backward, rotating, and landing. These basic programs allow the drone to move up to 100 centimeters with each element of the program and it creates both takeoffs and landings that are very smooth. Creating the program is as simple as tapping each desired element and bringing them together in the programing field. Then, once the program is built to the students’ preferences, hitting play will get the drone in the air and doing exactly what the program dictates!
Besides introducing them to basic programming, Tello EDU helps unlock a new world of coding possibilities for students. It’s designed to simulate real-world experiences (thanks to the DroneBlocks Simulator) for them to try right in the classroom and its more advanced programmable features include the ability to perform eight different airborne flips, fly up and down in what’s known as bounce mode, and automatically begin shooting video after being programmed to do so. There is also plenty of helpful content for teachers and students to watch before diving more deeply into coding with the Tello EDU. This is a very helpful way to learn about all of its features and to ensure students are using them right! Adding programming to drone piloting, in our opinion, is a genius way to increase achievement in 21st century learning and an amazing way to prepare students for the future, making the Tello EDU a great piece of technology!
Swarm
You’ve heard of a swarm of bees, right? And, you know that drones make a similar buzzing sound? Maybe. Well, Tello EDU drones have a feature that enables students to program a group of them to fly together and execute the same moves in the air! Known as the ability to ‘swarm,’ this feature is a cool added bonus to programming with the Tello and one that students will love to explore. Tello EDU drones are perfect for flying indoors (with high enough ceilings) and these kind of windless environments are ideal for giving the swarm feature a try. While in the air together, the drones can still move forwards, backwards, up, down, rotate, and capture images. They just have to be programmed using the same sequences before they take off—something that students can do right from the app!
As we mentioned, Tello EDU’s are capable of performing eight different kinds of flips while in the air. They have a maximum flight time of 13 minutes, which is pretty good, and can travel up to 100 meters from where they launched. They can also fly up to 30 meters high and move at a maximum speed of eight meters per second. Now that we have all that important information out in the open, let’s get back to discussing the swarm. Groups of students can work together to program their drones to fly in groups of four. That means 8-12 students can be working together on one program that will result in a cool swarm! Not only is it cool to see a small pack of drones flying through the sky together, this feature also gives students the fantastic opportunity to collaborate on a very cool project!
Programming the drones to fly in a swarm can be done using one device. The Tello and Tello EDU apps are available for download on iOS and Android devices. To get the drones to fly together, students can use code to write programs on the app, being careful that they all have the same steps and ensuring that no two drones will ever collide with each other (or with any other structures or ceilings in the area). When programmed as part of a swarm, Tello EDU’s can still perform their flips and other acrobatic movements. The swarm feature is designed to add an extra element to programming with Tello EDU—one that also helps students push the limits of their creativity while they start to think more like engineers. To grab a Tello EDU drone or one of the classroom packs, head over to our store!
Photo and Video
Like any cool drone, the Tello EDU drone is also very much capable of shooting photo and video from the air. Unlike all other drones, however, it has some pretty advanced technology that helps kids capture images from their flights. The most notable of those features is its built-in electronic image stabilization. Paired with Tello’s high-quality image processor, this feature ensures that students are able to capture the clearest images every time they take flight. That goes for video, too, and this technology is easily a favorite among students. Plus, it’s easy to activate the Tello EDU’s photo and video capturing whether students are creating a certain program or just flying freestyle. And, when using the Tello app, the option to snap photos can also be toggled directly from the screen!
The camera is located at the very front of the drone directly in the center and between the two front propellors. It’s able to capture both JPG’s and HD MP4 video with a field of view of 82.6 degrees. Each Tello EDU kit also comes with the corresponding amount of USB cables so that uploading photos and videos is easy. This, of course, allows students to see things they normally would not be able to catch and report on what they discover while their drone is in flight. Having used the Tello EDU, snapping photos while the drone is airborne really is as easy as pressing an on-screen button. The quality is also pretty good and, as long as the drone is level, there does not usually appear to be any blurring or other issues!
Depending on the device you’re using to fly the Tello EDU, the photos and videos should save directly to it. If you’re using an iPhone, for example, any in-flight photo that’s snapped should save to the Photos app and be viewable right away. While the videos the Tello can record are limited in terms of length, its EZ Shots feature makes capturing a breeze. If students are more interested in a live view of their flight, the Tello EDU camera supports that, too! Known as first person view, they can access this feature with the app as well. This allows the pilot to literally see what the drone is seeing and enjoy a bird’s eye view while their drone does the same. To be honest, we could talk and talk about the Tello EDU’s camera, but you should really just get a kit for yourself and see what it’s all about.
Battery Life
When using drones in education, it is important for educators to consider the battery life of the ones they select. This is true with any flying of drones, but something especially relevant to educators who need to be sure they are filling an entire class period with enough experiential learning for their students. Typically, the lower a drone is priced, the shorter it’s battery life is, but that’s not entirely true with the Tello EDU. The cost of one Tello EDU drone is $129 and its 13 minutes of battery life are a great value at that price and pretty impressive for its small size. To put that in perspective, most high-end drones are only able to average between 15 and 20 minutes of flight time without needing to recharge while the longest flying time using today’s technology is no more than 25 minutes.
It’s recommended that the Tello EDU only be flown indoors and that students should only bring it outside in near windless conditions (ideally in completely windless conditions). This is due to its small size and weight, but battery life also comes into play. If the Tello were to be dealing with windy conditions while flying, its battery strength would decrease much more quickly. When flown indoors, however, it may sometimes even last a bit longer than the 13 minutes it’s advertised to support. We don’t recommend trying to push this limit, though, because there’s nothing worse than a drone’s battery dying while it’s in the air. Even though most students using the drone indoors wouldn’t be flying it very high, it would still come crashing down and could hurt someone if it were to land on them. If nothing else, it could suffer damage to the propellors or even the camera if it lost power in the air and came crashing down on a hard surface.
When piloting the Tello EDU, students are able to see the drone’s battery percentage on the screen of the mobile app they are using. It might also be a good idea to use a stopwatch, timer, or smartphone to set a timer for 12 or 13 minutes to ensure that students are able to safely land their drones before any loss of power comes into play. Before starting any lesson with the Tello EDU, educators should be sure to charge it for about an hour using the included USB cable. This will ensure that it’s at its maximum strength as soon as students get it in the air. Extra batteries are also available for purchase on our store, which help ensure that class time is not lost to charging. They are just $19 each and we also offer a multi battery charging hub on our site as well—everything students and teachers need to make sure they’re maximizing the battery life of the Tello EDU!
Included Accessories
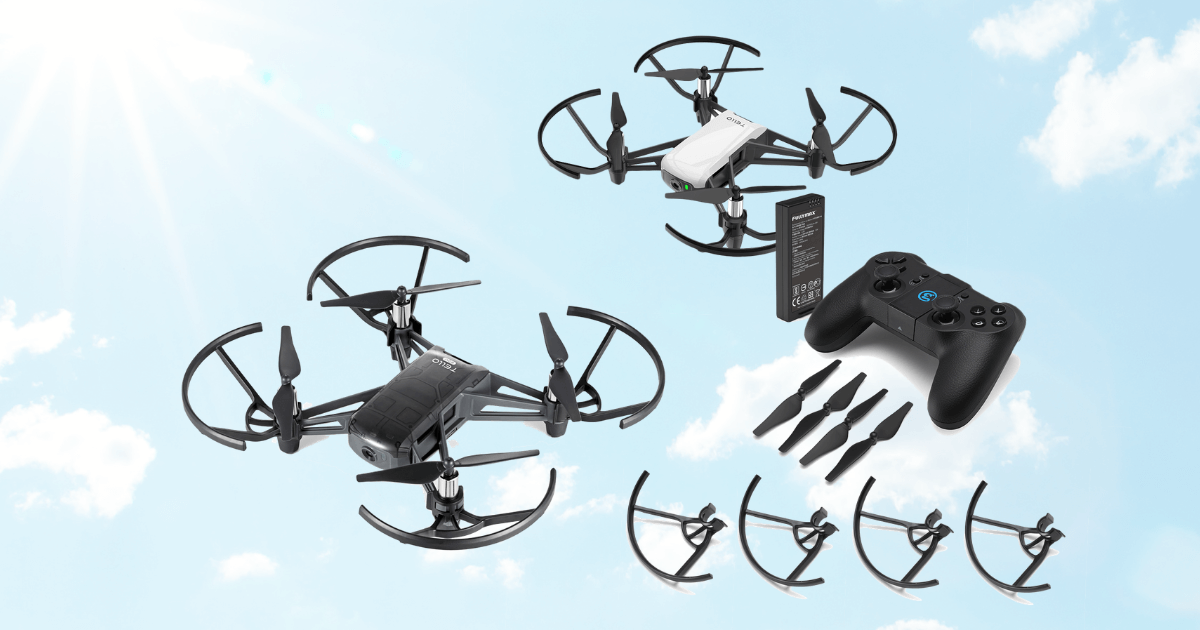
Depending on the Tello EDU kit that’s right for you, there will be different amounts of accessories that come with it. The single units have accessories for one drone and each of the three classroom packs have accessories for all of the drones in them. Basically, you will have enough accessories for the exact number of drones you buy. Anyway, those accessories include the drone’s battery, a micro USB cable for charging that battery using any USB port, eight propellors (four for the drone and four extras), four propellor guards, four mission pads, and one propellor removal tool. These included accessories help give educators some wiggle room should any of them get damaged during flights or lost between uses and make it easier to keep the drones operational.
We also offer additional units of these accessories separately on our store as well. The propellor guards and extra propellors can be purchased in sets of four while the drone flight batteries can be purchased individually, too. We also provide the Tello EDU multi battery charging hub, which can charge up to three Tello batteries at a time. You can find each of these accessories on our store. Among them, only the multi battery charging hub is not included with the single Tello EDU unit. Additionally, the classroom packs come with some extra accessories on top of the normal amount that is usually provided. These extras include plenty of charging hubs, extra batteries, extra propellors, and extra propellor guards, giving those who purchase classroom packs all the equipment they need to support a class full of students!
The mission pads are a great tool to use with the Tello EDU and an awesome accessory to help get students excited. They’re small pads (similar to mouse pads) that the Tello can use its camera to detect while in the air. They are double sided and feature unique patterns of shapes that help the Tello understand the commands it should execute. The drone can actually recognize the various patterns and their alignment helps it understand what to do. The mission pads can be used with a Tello EDU that has SDK 2.0 and they must be placed on a flat surface. After that, students need to enable the Tello’s detection capability and then have it take off and hover in place. Using all of these accessories and the programming features help make the Tello EDU an excellent option for first time drone pilots and programmers. To place an order for a single Tello EDU, a classroom pack, or the DroneBlocks PD tools, click below to visit our store!
For the latest EdTech, STEM, and 21st century education news, follow us on Twitter and Instagram. Like us on Facebook, too, or sign up for our newsletter for our latest product announcements and offerings. If you have an idea for an Eduporium Weekly theme, send us a message on social media or comment below.