

Like many additions to STEAM learning we've seen in the last couple years, the Ozobot simulator allows students to continue coding education at home—or anywhere they can connect to the Internet. Plus, students can also access and use the brand-new MetaBot to experience augmented reality programming. Both the MetaBot and the Ozobot simulator are accessible online through any modern browser. Whether they have an Ozobot robot with them or not, students can use the simulator to create and run realistic programs. This solution levels the playing field by providing students with an accessible way to develop their computer science skills.
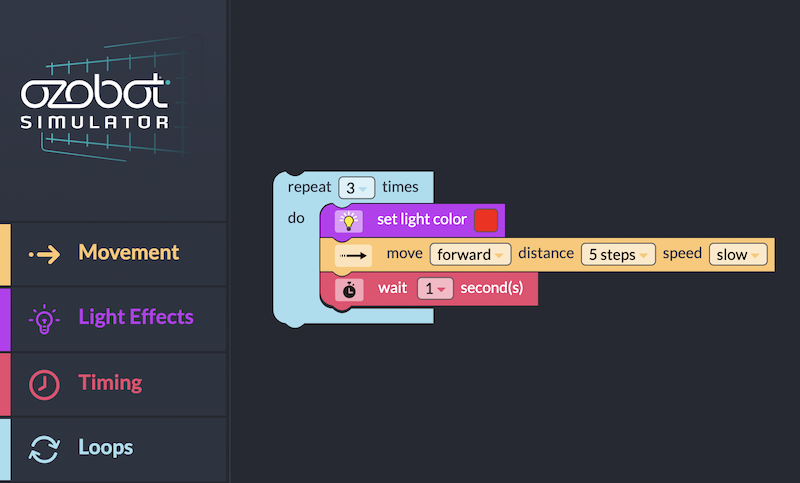
The Ozobot Simulator.
Students can access the Ozobot simulator through the Ozobot website. It's best to use the simulator in full-screen on a computer, as it's not currently compatible with mobile devices. The simulator's design resembles the OzoBlockly coding environment, which will help students quickly adjust. On the left side of the screen, students will find the familiar types of programming blocks: Movement, Light Effects, Timing, and Loops. They're the same blocks they may have used with the OzoBlockly editor in the past. However, students do not have access to the Sounds section available in OzoBlockly. There are also fewer block options available within each category, but students can still create many different programs for the on-screen Ozobot.
Coding with the Ozobot Simulator.
When coding with the Ozobot Simulator, students can drag and drop any code block into the programming field. The drag-and-drop coding feature is popular and effective, allowing students to familiarize themselves with the process of building a program. In the simulator, many programs focus on movement. With the movement blocks, they can control the virtual Ozobot's direction, distance, and speed. Each movement block represents a "step," a certain distance that the robot will move. In the simulator, five steps equals the length of one square in the virtual grid. So, programming the Ozobot to move 10 steps tells it to move the length of two squares. And programming it to move one step will tell it to move one-fifth the length of one square. Students can experiment with the complexities of coding the virtual Ozobot to move in different directions.
More Ozobot code blocks.
The simulator also includes the option to program light effects, indicated by purple blocks. Students can use these blocks to create light displays on the virtual Ozobot. Such displays include setting the light to one of seven colors, displaying a rainbow, mimicking a traffic light, activating disco lights, and more. These blocks are often placed at the end of a program as a celebratory completion of the Ozobot traveling from Point A to Point B. Below the light effects, students can find even more blocks, including the timing block. They can use this block to make their virtual Ozobot pause for 1–10 seconds during a program. Finally, if students want to repeat part of their program, they can add the light blue loops block. Then, they can drag part or all of their existing code inside the block and set the number of times they want it to repeat.
Adding blocks and running programs.
The middle of the simulator screen is home to the programming field. As students select blocks, connect them, and build a program, they will drag the blocks to this field. Because the blocks are color-coded, they'll be able to see at a glance which functions they've included in their program. To remove blocks from the field, students can easily drag them to the trash can icon. The undo and redo buttons are also found there. And right clicking anywhere in the programming field shows students options for cleaning up blocks, collapsing blocks, expanding blocks, and deleting blocks, as well as the same undo and redo options. These editing options allow students to learn through trial and error, understanding that failure is just one step on the way to a successful program.
Now that we've covered coding with the blocks, let's explore the rest of the Ozobot simulator. The most important piece of the simulator is the on-screen representation of the robot, found in the grid on the right side of the screen. The grid measures 12x8 squares and, as mentioned above, each square represents five steps for the Ozobot. Students can use the plus and minus buttons below the grid to zoom in or out. To find activities with which to explore the grid and virtual robot, students can click the 'Explore Challenges' button at the bottom left of the screen. This button links to the Ozobot Shape Tracer and OzoTown game. Both are great options for supplementing coding experiences with fun games that help students apply what they've learned. The OzoTown option even features 10 progressive challenges they can complete before moving on.
Sharing your Ozobot Simulator program.
Once they have built a program, students can press the turquoise button that says 'Run,' and the on-screen Ozobot will complete the program. They can keep a record by downloading a png of their program, or, to share a program with a classmate or teacher, they can click the 'Share Program' link. This generates an additional URL they can copy and paste. When clicked, it will bring anyone with access directly to that specific program.
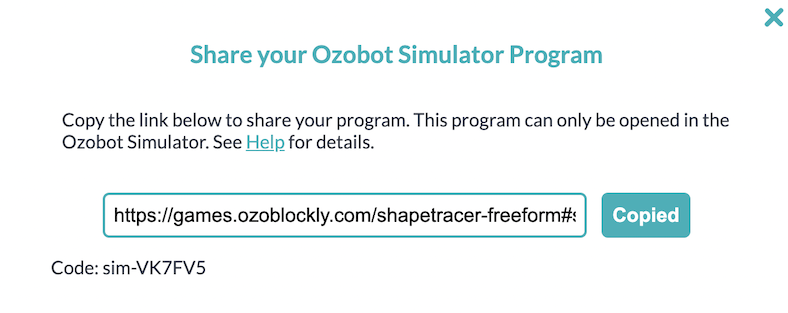
On the flip side, if teachers or students have a link to an Ozobot simulator program, they can click the 'Open Program' link below the grid. Instead of pasting the URL there, however, they can paste the code (pictured above) that appears beneath the URL. Lastly, if students have a physical Ozobot Evo, they can click the 'Connect' button below the sharing options. After building a program, they can download it onto their robot using Bluetooth and the same process they would when coding with OzoBlockly.
The Ozobot MetaBot
The other option for virtual coding with Ozobot is the MetaBot, an augmented reality (AR) version of Evo. The new MetaBot feature is found right in the OzoBlockly platform. Usually, students can choose whether they're coding with the Ozobot Bit or Ozobot Evo by selecting an option in OzoBlockly. Now, as you'll see, there's also a third option. Clicking the MetaBot button allows students to design programs for an augmented reality robot and take their turn at entering the metaverse. Once they enter the MetaBot environment, the turquoise button at the bottom of the screen will prompt them to launch MetaBot. Clicking the button reveals a QR code that students can scan with their phone's camera. Then, their OzoBlockly program will open in their mobile browser, with the augmented Ozobot Evo ready to go!
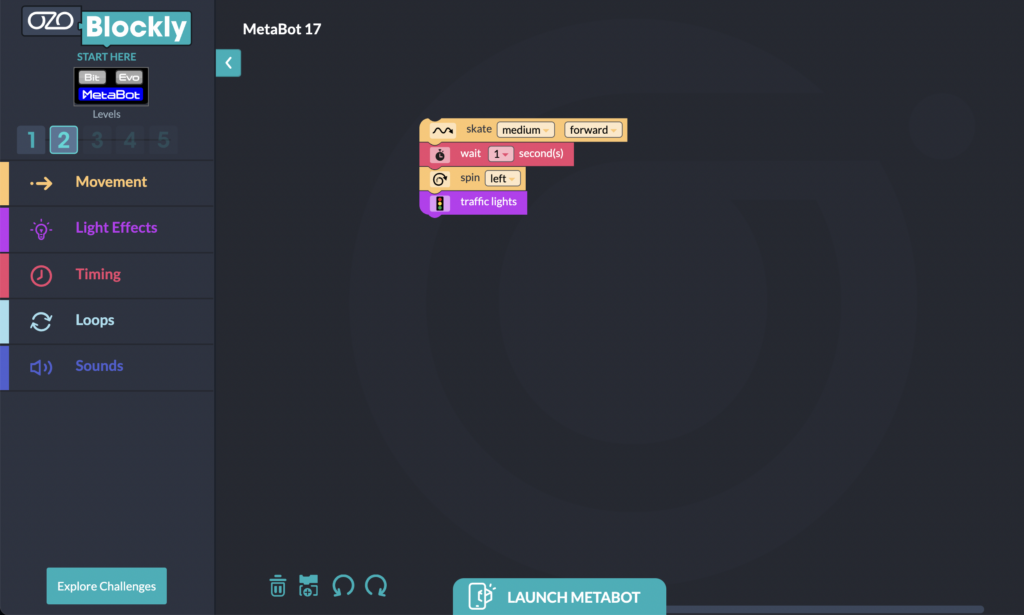
How to use the MetaBot through OzoBlockly.
Since the popularity of the metaverse is booming, the Ozobot Education team saw the need to connect computer science with this new dimension. The result is the MetaBot, which is the first educational AR robot. Not only does it help educators extend coding lessons, it also helps them expand inclusion by giving students the opportunity to explore robotics and programming from almost anywhere. Students get to take part in 3D experiences and watch as the augmented Evo runs the programs they create. Plus, there are plenty of lessons available within the updated Ozobot Lesson Library. MetaBot extends the capabilities of OzoBlockly and enables students to put a new spin on virtual coding.
We hope you try out the Ozobot coding simulator and the MetaBot! Both are comprehensive options for students to code at home and keep their computer science skills sharp! Head over to the Ozobot website to find the simulator and contact us if you have any questions. You can also find some helpful Ozobot troubleshooting tips around our blog. Follow us on Twitter/X and Instagram for more, and find our Ozobot offerings below!
Is it in inches?
thank you